One of my blog readers, James Burke, sent a few comments on the line in “Bird by Bird, Part 3B” that I considered to be a thorn in Black’s side:
1. e4 e5 2. Nf3 Nc6 3. Bb5 Nd4 4. Nxd4 ed 5. O-O g6 6. d3 Bg7 7. f4 c6 8. Ba4 d5 9. ed Qxd5 10. Re1+ Ne7 11. Bb3 Qd6
This was James’ idea, instead of the move 11. … Qd8 that was played by Boris Spassky, which I looked at and found wanting in “Bird by Bird, Part 3B.” The most relevant continuation seemed to be the following one, where Black offers a pawn in order to get his king out of danger and discombobulate (what a delightful word!) White’s pieces:
12. Qe2 h5! 13. h3 (Note: Simply playing 13. Nd2 and allowing Black to go ahead with 13. … Bg4 may actually be White’s best bet.) 13. … Be6 14. Bxe6 Qxe6 15. Qxe6 fe 16. Rxe6 Kd7 17. Re4 Nf5.
Here I commented that I didn’t really trust Black’s pawn sacrifice, and I felt that this might be the zenith of his play and that White would gradually get his pieces organized and consolidate his pawn plus. James thought I was being too pessimistic, and I finally think that he may have a point. The thing is that the upcoming move … Ng3 is pretty annoying, maybe even more than annoying. White’s rook gets chased back to e1, where it really has nothing to do — it can’t go to any active squares like e2 or e4 or f1. Basically, the only thing White can do with his rooks is trade them, but Black doesn’t have to cooperate with that: he can put a rook on f8 and start pressuring the f-pawn.
The pressure on the f-pawn is the second ingredient I underrated in this position. Actually, I wonder if I accidentally did some of my analysis with a pawn still on f7 (this is one hazard of analyzing “by hand” instead of on the computer!). Otherwise, it’s difficult to understand why I would have written “I don’t see anywhere on the board where Black can actually create threats.” The pawn on f4 is such an obvious target, on a half-open file and with its natural defender, the g-pawn, rendered useless by Black’s knight (and, ultimately, the h-pawn).
So now I’m starting to understand why the engines evaluate the position as close to equal. I would now say that it’s okay to go ahead and try this line, 11. … Qd6. It’s risky, but now that we have really understood the ideas I think we will be well prepared for it.
Just a word about computer analysis here. James in fact went on to give a line that went all the way to move 51 (!!). I think that when you’re analyzing openings, especially on a computer, there are certain points where you may need to rein yourself in and realize when you’re crossing over from real chess into fantasy chess. It’s fantasy chess when you have gone 10 moves beyond any previously existing games. (As noted in James’ comments, 11. … Qd6 would be a TN; it has never been played before. In the databases he and I have consulted, the only previous occurrence of this variation was the game where Spassky played 11. … Qd8.) So, using my 10-move rule of thumb, anything past move 21 is definitely fantasy chess. But more to the point, I think that when analyzing with a computer you want to use it to navigate past any forced tactical lines, but then when the position calms down again and the action is not forced, you need to disengage from the computer and look at the position with human eyes. What are the plans for White and Black? What are the weaknesses and strengths? What is your opponent likely to play? In this variation, the time for stepping back is around move 17, where the tactics stop and both sides need to think about how to arrange their remaining armies. That’s why I have tried to analyze the position after 17. … Nf5 in words only, without variations.
However, I do have to admit that James found one wonderful, wonderful computer line. While acknowledging that this is sheer fantasy, and that it has at best a 0.001 percent chance of ever happening in a real game, let’s just look at this line for the fun of it. It does at least give us an idea of what Black is playing for, and why he does in fact have winning chances, not just drawing chances.
James’ line goes 18. Na3 Ng3 19. Re1 Rhf8 20. Bd2 b5 21. Kf2 h4 22. Kf3 g5 23. Kg4 gf (see diagram).
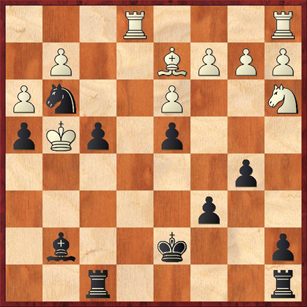
Why doesn’t White want to play 24. Bxf4?
So far this is fairly logical. I have some doubts about White’s king raid — I don’t think a human is likely to play that way — but it is probably his best and sharpest attempt to keep from losing the f-pawn. But now Rybka wants to play a move for White that looks utterly mad: 24. Rab1. When you see a move like this, even from Rybka, you have to stop and ask yourself, “Wait a minute! What the heck is going on?” Even if this is the best move in this position, it is a move that no human would ever play. Ergo, it is not the main line.
The question that our analysis has to address is, “Why doesn’t White play 24. Bxf4 in this position?” This is the move that most humans would play, and it loses for White. If you haven’t done so already, you should stop and see if you can figure out why.
Have you figured it out? It’s extraordinarily lovely. After 24. Bxf4? Rxf4+!! (James doesn’t even mention this) 25. Kxf4 Bh6+ White has three king moves. Two of them get mated, and one of them allows Black to win back all of his material and then some.
The prettiest line, I think, is (A) 26. Kg4 Rg8+ 27. Kxh4 Nf5+ 28. Kh5 Rg5 mate! (See diagram 2.)

A lovely, pure checkmate with three Black pieces. This is why I often say in my ChessLectures that three pieces against a naked king is often mating material — although the three pieces have to coordinate perfectly, as they do here.
A slightly more routine checkmate is (B) 26. Kf3 Rf8+ 27. Kg4 Rf4 mate.
And finally, the line where White doesn’t get mated is (C) 26. Ke5. But now Black plays 26. … Rf8! and the king is almost in a mating net. The threat is 27. … Bg7+, and the only way for White to escape is to take another pawn with 27. Kxd4. But now Black wins with a skewer and a fork: 27. … Bg7+ 28. Ke3 Bxb2. Black wins a full piece, and the material will be B+N versus R+P, which should be winning for Black.
Fantastic stuff! Now, of course, we understand why Rybka wanted to defend the b-pawn with its mysterious rook move, 24. Rab1. But even so, your human opponents would never, ever play that move. I guarantee it!
So thanks, James, for the analysis and for a nice trip into fantasy-land!
Back to Table of Contents.