I’d like to continue my series on the Bird Variation now. But first, I need to clarify a little bit of terminology, in response to a comment from Michael Goeller. He suggests calling the whole variation 1. e4 e5 2. Nf3 Nc6 3. Bb5 Nd4 4. Nxd4 ed 5. O-O g6, which I am advocating, the “Blackburne Variation,” in honor of Joseph Blackburne, who played it against Capablanca in 1914. I’m cool with that, although I wonder whether we should call it the Blackburne Variation or the Blackburne Subvariation of the Bird Variation.
In Bird by Bird, Part 2 I said I was going to split up my analysis into three main parts: the variations where White plays f4, the variations where he plays c3, and the variations where he retreats his bishop instead of exchanging on d4 (or, in some cases, after Nxd4 but before the bishop is actually chased with … c6). Today, we are going to talk about what happens in the Blackburne Variation when when White plays f4 and then replies to Black’s … c6 with Ba4. So here is the basic position we’re talking about today:
1. e4 e5 2. Nf3 Nc6 3. Bb5 Nd4 4. Nxd4 ed 5. O-O g6 6. d3 Bg7 7. f4 c6 8. Ba4 …
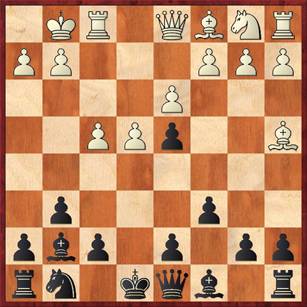
Diagram 1
However, to make things a little bit more confusing, there are move order issues. In three of the four tournament games that I have played with this setup, the move order has actually been
1. e4 e5 2. Nf3 Nc6 3. Bb5 Nd4 4. Nxd4 ed 5. O-O g6 6. d3 Bg7 7. Nd2 Ne7 8. f4 c6 9. Ba4 …
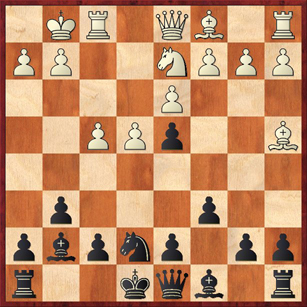
Diagram 2
As you can see, an extra pair of moves has been inserted in Diagram 2. This makes a huge difference, because the whole point of the retreat of White’s bishop to a4 is that he is trying to prevent Black from playing … d5 and clogging up the center. As we have seen, that was Black’s (successful) strategy in the Bc4 lines, covered in Bird by Bird, Part 3A. In Diagram 2, we see that Black can play 9. … d5! and equalize easily. If 10. ed Nxd5 11. Re1+ Be6 White cannot start any hanky-panky with 12. f5? because of the powerful rejoinder 12. … Ne3! Instead my three opponents played 10. Bb3 Be6 (Morrow-Mackenzie, 2005), 10. f5?! gf 11. ef Bxf5 (Feeney-Mackenzie, 2001), and 10. Nf3 Bg4 (Bell-Mackenzie, 1999). In all three cases Black maintained his strong center and had a fine position. (I won two and drew one.)
So the trouble with interpolating 7. Nd2 is that it defeats the purpose of 9. Ba4. I really think that in all three cases, my opponents were just feeling their way move-by-move and really had no overall strategy. This is likely to be the case with your opponents too, if they are rated under 2200.
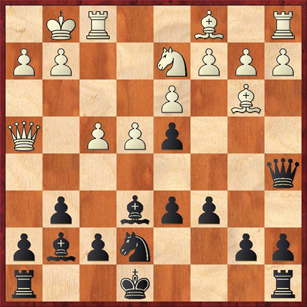
However, in Diagram 1 things are not so simple for Black. If he plays 8. … d5?! 9. ed Black will have to recapture with the queen: 9. … Qxd5. And the queen is much, much less comfortable on d5 than the knight was in the previous line. I spent a few hours back in 1998 analyzing this position, and finally I came up with 10. Re1+ Ne7 11. Bb3 Qd8! (diagram), which seemed satisfactory to me. (By comparison, 11. … Qh5 and 11. … Qf5 are dismal.)
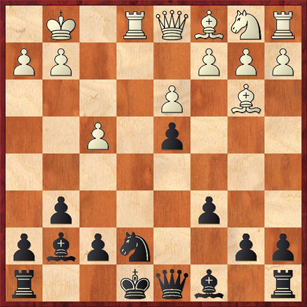
Diagram 3
And it’s true that if White tries a straightforward buildup with 12. Qe2 Bf6 13. Nd2 O-O 14. Ne4 Bg7, there is nothing wrong with Black’s game. This exact position arose in a game between Florian Jenni and Boris Spassky in 2001 (the game ended in a draw). If we have a world champion on our side, it can’t be too bad, right?
Unfortunately, Fritz finds in Diagram 3 a resource that both Spassky’s opponent and I missed: 12. f5! Bxf5 13. Bg5! f6 14. Bf4 +/=.
Now admittedly we’re only talking about +/= here, so in theory this position is still playable for Black. But the move 12. f5 just has such a feeling of rightness about it to me. White in one stroke resolves his biggest problem, the f-pawn blocking his QB, and immediately puts the bishop to very effective use. After 13. … f6 Black can no longer castle kingside and it’s unlikely that he will have time to castle queenside either. When I analyzed with Fritz, it seemed as if Black was forced into really unnatural contortions like … h5, … Bh6, … Kf8, etc. Well, they say a pawn is worth a little trouble, but I just don’t have any faith in this line for Black. Try it if you’re brave, or if you don’t think your opponent will find the move 12. f5.
So, going back to Diagram 1, we must regretfully conclude that 8. … d5 is premature. And 8. … Ne7, attempting to transpose to Diagram 2 (if White cooperates with 9. Nd2?) also lands Black in very hot water after 9. f5!, with the big threat of f6. So we’re left with the only other possibility, in my opinion, 8. … d6 (diagram).
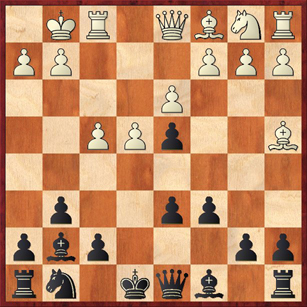
Diagram 4.
Now as you can tell from my previous comments, I am a very big fan of playing … d5 for Black in the Blackburne Variation, so I am not a happy camper when I am forced to settle for … d6. White’s move 8. Ba4 has indeed forced a concession from me. But there is some consolation: White’s bishop on a4 is somewhat out of play and will have to spend another tempo to get to the diagonal it really wants to be on. Meanwhile, Black should just sit tight, complete his development, and try to entice White to make a mistake by playing too aggressively.
For instance, I had a friend named Brian Seymour who was convinced that the way to refute this opening was to play 9. f5 in Diagram 4. We have indeed seen that f5 is a crucial move in many lines, but here it’s premature. Black can just play 9. … Qe7 10. Bb3 gf (don’t want to allow the opening of the f-file) 11. ef Bd7 and castle long. That’s the problem with committing yourself to a kingside attack too soon — your opponent might up and castle queenside.
Incidentally, for some reason I never played 9. … Qe7 against Brian. Instead I always played 9. … Be5?, which makes no sense at all. Unless White does something stupid, the bishop is not going to accomplish anything on e5, and meanwhile Black has wasted a tempo that he really needed to get his king to safety. As a result, I used to get into some really sketchy positions. It never occurred to me that 9. … Be5 was the reason why.
The first time I actually got to Diagram 4 in a real tournament game was this year, in the U.S. Championship Qualifier, against a master named Glenn Bady. He played much more sensibly with 9. Nd2 and I replied 9. … Ne7?!, which I think was too inflexible. You’ve seen already that … Ne7 is my usual plan in the Blackburne Variation, but sometimes you have to adapt to the circumstances. The computer thinks that 9. … Nf6 is the correct move here, and that is what I will try next time. One reason I’ve avoided it is that it weakens the defense of the d4 pawn, Black’s pride and joy. But Fritz comes up with a nice tactic that shows why Black doesn’t have to worry: 10. Nf3 O-O! (diagram)
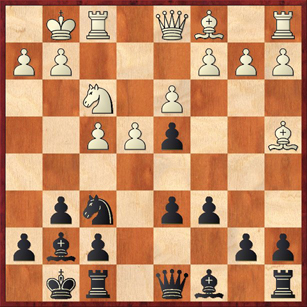
Diagram 5
White cannot win a pawn with 11. Nxd4 because of 11. … Qb6 12. c3 Ng4. To go a little deeper, if 13. Kh1 Bxd4 14. cd Qxd4 15. Qc2 (forced) d5! and Black has finally achieved his thematic break. We can also see in this line that Black is finally taking advantage of some of the positional trumps that 7. f4 gave him — the diagonal a7-g1 leading to White’s king and the weak square on g4 that is just inviting Black’s knight to settle in.
Unfortunately, in the game against Bady I didn’t have the computer helping me. From Diagram 4, the game went 9. Nd2 Ne7?! 10. Qe1 Qa5 11. Bb3 Be6 12. Qh4! +/- (diagram).
Actually, 12. Bxe6 was also good, but I really like this move by White, which puts the finger on everything that is wrong with Black’s position — the weak dark squares, the loose knight on e7, the uncastled king. I flailed around with 12. … Bxb3 13. Nxb3 Qc7, but after 14. f5! (once again this key move) I was in a bad way. I never did manage to castle, and went down in flames.
So there you have it — the good and the bad. I feel a little bit uneasy leaving you with a recommendation (8. … d6 9. Nd2 Nf6 with the idea of 10. Nf3 O-O!) that I have not actually tested out in a tournament game. Not only that, it has never been played in any tournament game by anybody, according to ChessBase. You can be the first! Alternatively, you can try out the Spassky line, 8. … d5 9. ed Qxd5 10. Re1+ Ne7 11. Bb3 Qd8, but just be prepared for some difficult defense if your opponent comes up with 12. f5! instead of the ho-hum 12. Qe2.
Back to Table of Contents.